- Software: Adobe Illustrator
- Required Skill Level: Beginner
- Category: Graphic Design
Introduction: What you will learn!
In this Adobe Illustrator tutorial, we will teach you how to create banner ribbons, aided by clear instructions and screenshots.
The process is simple, and we’ll walk you through it step-by-step.
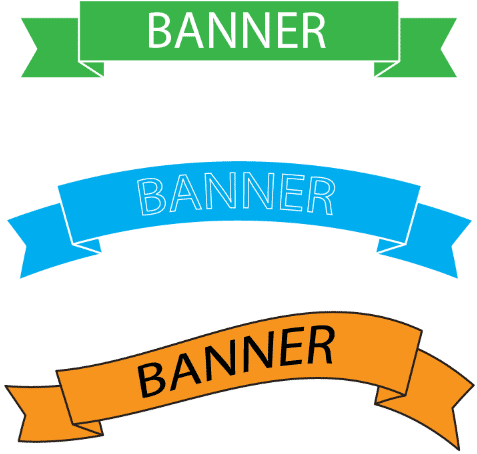
Here is the preview of the banners you’ll learn to make:
But before we get started, please use the infographic below to familiarize yourself with the tools and their names in Adobe Illustrator. Or you can read this post by Adobe.

Tutorial: Create Banner Ribbons with Adobe Illustrator
Now, the fun part: let’s start creating our banner ribbons!
We will create the first one and use it as a template for the rest.
Step 1.
Now open the Stroke Panel (Windows > Stroke.)
- Set the weight to 2 points.
- Change the cap and the corner under the stroke to round.
Step 2.
Select the Rectangle Tool and draw a rectangle:

Step 3.
Now copy that rectangle by pressing Command+C (Mac) or Control+C (Windows), then Command or Control + V to paste it.

Step 4.
Pick the Selection Tool from the “Tools” menu and drag the left and right corners of the 2nd rectangle to make it smaller and shaped almost like a square:

Step 5.
Move the smaller rectangle and place it on the left side of the big rectangle, as shown bellow:

Step 6.
Now, zoom in on the small rectangle. With the Selection Tool still selected, hover over the centerline of the small rectangle and press the ‘+’ key to access the Add Anchor Point Pen Tool.
Click on the left-center point of the rectangle to add a point to drag from:

Step 7.
Select the Direct Selection Tool. Drag over your new left middle point while holding the ‘Shift’ key. Select the point and drag it to the right to make a flag-like shape:

Step 8.
We’ll now send the small rectangle behind the big one. First, we will select the small rectangle with the Selection Tool (make sure only to select the small rectangle,) then right-click (or Ctrl+Click if you don’t have a right-click button) and go to Arrange > Send to Back.
This places the small rectangle behind the big rectangle:

Step 9.
Next, select the Line Segment Tool and set the fill to none by selecting the red slash on the Fill and Stroke Tool. Draw a line from the bottom left corner of the big rectangle and connect it to the lower right corner of the small rectangle:

Step 10.
Select the small rectangle and the line we just drew. Hold the Alt+Shift, and drag the graphic to the right. Pressing “Alt” duplicates the graphic: hold Shift while moving to limit movement.

Step 11.
Now select the new copied graphic, right-click (or Ctrl+Click on a one-button mouse,) select Transform and then Reflect.
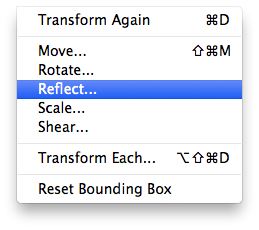
Step 12.
We now need to Reflect Vertical, which flips the graphic on its side.

Step 13.
Now select the 2nd small rectangle (flag-like shape) if not already selected. Hold the ‘Shift’ key and move the graphic to the right so it lines up with the big rectangle, just as you see below:

Step 14.
Using the Selection Tool, drag over the entire graphic and hit Cmd+G on Mac (Ctrl+G on a Windows) to group the objects together. When you work with the graphic, you can select any point, and the entire graphic will move.
Step 15.
After completing step 15, select the Type Tool, pick your preferred font, and type ‘Banner’ or whatever text you desire.

Step 16.
Press Command+A on Mac or Control+A on Windows to select all the shapes. Now well, duplicate the graphic by holding Alt+Shift on your keyboard while dragging the graphic down to copy:
Step 17.
Next, let’s tweak the second banner. Begin by selecting the 2nd banner with the Selection Tool, then access Effect > Warp > Arc:

The small ‘Warp Options’ window pops up with available settings:

Step 18.
Click on Preview, and you will see a very cool new banner shape with a bit of a curve:
You can change the ‘Bend’ settings as you please to get the exact look you like, then click ‘Ok.’

Step 19.
Now select the Direct Selection Tool and click on the corners shown in the image below. Hold the ‘Shift’ key and drag the top left point to the right and the top right point to the left.

Your results should resemble the new banner below:

Step 20.
Now for the 3rd banner! Select the Selection Tool, drag over the 2nd ribbon to select the entire graphic, then press and hold the ‘Alt’ and ‘Shift’ keys. Drag the graphic downward to make a copy; now, you should have three ribbons.
Step 21.
Select the 3rd Ribbon with the Selection Tool. Then go to Effect > Warp > Flag as shown below:

Step 22.
Click on ‘Preview’ to see the changes made to the banner. Just tweak the ‘Bend’ settings, and you’ll see changes made.
Once the banner meets your approval, click ‘OK.’

Step 23.
Now that you have three banners that you like, it’s time to play with colors! Select a Ribbon with the Selection Tool, pick the desired color, and change the ‘Fill’ to that color.
That is all there is to it!
Illustrator Banner Creation Wrap-up
You have now created three completely different unique banners, perfect for web and design use.
Also, you’ve learned several vital principles about Adobe Illustrator use in the process.
Now, if you want to package these graphics and send them to a web designer, print shop, or publisher, read our tutorial on how to package files in Adobe Illustrator.


